Showing posts with label rehab. Show all posts

Friday, November 27, 2015

Rehab overgrown area by curb and build stacked stone wall

New rock wall and tree neaten up our entrance
Two old, large maples have graced the sides of our front walkway until recently. Unfortunately, over the past few years we noticed that one of them was being eaten by insects. Apparently the department of transportation is responsible for the trees along our street, so I contacted them to check out its health. One day I noticed that the tree had been marked with spray paint -- apparently VDOT came and decided that the tree could not be saved.
Poor tree was marked for its demise
Several months passed and one day there was a crew in my yard, ready to go. They were worried about nearby wires, and I gave them the green light to do whatever they could to avoid them, even if that meant our old fence might get hit.
Tree being taken down carefully, to avoid wires
I knew it would not be a pretty sight when the tree was gone, but what greeted us was downright ugly. The falling limbs did take out part of the fence, which was already dilapidated -- but it never concerned me because it had always been hidden. Several Rose of Sharon trees along the fence had been heavily pruned. The old tree's wide stump remained. An overgrown old planter was full of weeds and was falling apart.
Yuck
This area of our home was not on my radar as needy. Now every time I came home I saw an eyesore. I had to do something. But what? I was not going to hire pros, so what could I do to make this look better?
So welcoming...
The first thing I wanted was a new tree to bring life back to this area, and maybe a little privacy. Our backyard had never been so visible in our years in this home. The weekend after the old tree was chopped, my brother in law left his convertible at our house in exchange for my car. I had a brainstorm: without a top, this could be useful to transport a tree! I packed my kids in and we headed to our local garden center.
The staff was skeptical and kept asking how far I was going to drive the tree
We picked out a nice, tall arborvitae and carefully drove it home. I dug a hole while the kids sort of helped, and we plunked it in. Already the spot looked a little better.
Tree helps a bit
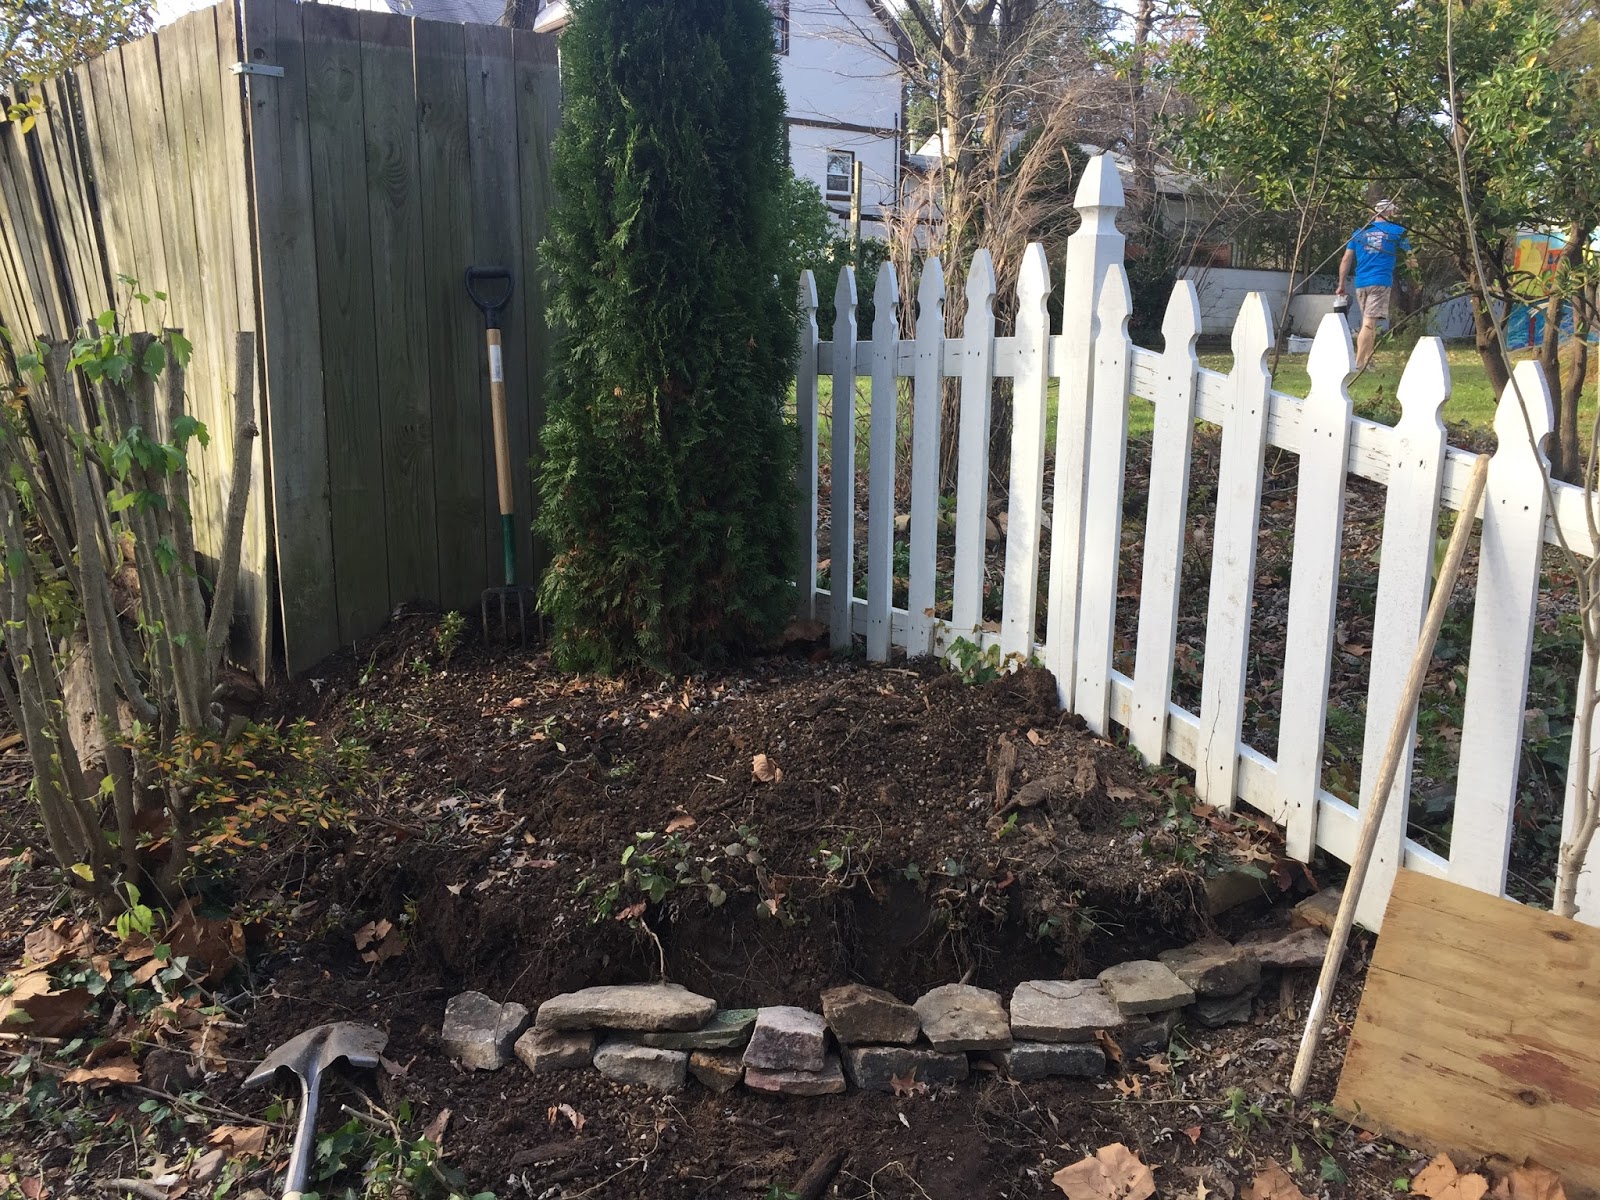
The rubble in this area was difficult to remove. The weeds I could pull out, and I clipped back some Rose of Sharon sprouts. But there were lots of bricks and rocks and some cinder block shards too... lovely. The long wooden posts bordering this garden bed were nailed together and proved impossible for me to remove: I tugged, jumped and pried to no avail. They would have to wait until my husband could help.
Had to call in the big guns
It ultimately took two of us plus a saw, an ax, a sledge, and a shovel to dislodge those messy wood borders. A lot of daylight was burned and I worried that it could be weeks or months before I had another surge of energy and the time to act on it. I pressed on, with the help of my daughter, who loaded up some of the stones I'd bought a month or so ago for the park benches on our corner.
Busting her hump to earn her keep
I liked the idea of a stone area by the benches, but the rocks I'd laid were not flat enough. They wobbled when we walked on them, and I was afraid this area would not be good for someone without firm footing. Rather than wait for the stones to eventually sink in, I would re-purpose them as a retaining wall.
Starting to lay the stones
I scooped away some dirt so the garden bed was an arc. Thankfully the soil did not cascade down and make a mess (I anticipated holding back a landslide and had a plank of wood and a stake ready). Laying the stones went much faster than I thought it would. Each rock was like a puzzle piece, and I only had to flip or spin it to see how it might fit. The shapes naturally worked together.
So much better!
I'm sore and our wheelbarrow broke while I was loading up stones, but it's done! It's not perfect, but what was an eyesore for months now looks a million times better. I'm elated! Progress! Now to surprise my kids with some Christmas ornaments for that tree.

Wednesday, November 25, 2015

Making due with hand-me-down dining chairs

Sturdy chairs from our garage replace our crumbling set
The dining room chairs that I reapholstered a few years ago (documented here) have been slowly disintegrating. The legs were loose despite several attempts to glue the joints, and after adding metal brackets for support. Recently, pieces started to snap off; the wood was too dry and brittle. Still, I was not comfortable getting rid of these chairs because they belonged to my father in law's aunts. I also liked their shape -- they made me think of a hacienda.

Then my father in law refused to sit in them. They squeeked and wobbled so much that he was afraid they would collapse and someone would get hurt. I started browsing online for alternatives. None were a great fit, and even a set of inexpensive new chairs would cost a thousand dollars. I would rather spend that on contractors to deal with improvements that I can't hack myself. So it made sense to turn to our garage, where a set of hand-me-down chairs had been lurking for the past year.

The first thing that needed to change was their seat covers. My mother in law had tried to freshen them, but the fabric she chose would not last a week with my kids.
These cushions needed an overhaul with durable fabric
I rooted through my fabric scraps from other projects and found a few pieces that could work. These were quickly cut to size and stapled over the seats. (For more instructions on how to redo this type of seat cushion, see my earlier post).
Scraps big enough to cover the seat cushions
New fabric wrapped around the seat and stapled underneath
Now all that was left was to screw the seats back onto the chairs.
Mismatched seat covers felt cohesive enough
But I did not love the finish on these chairs. A little of that tone would be ok, but it was too similar to our cabinets and floor. Also, I didn't care for the shape of these chairs. They are too curvy, too fancy. Hmm... I could not DIY my way out of the shape, but what if I lightened up the wood?
Color of the wood was too similar to our dark cabinets and floor
I made a quick trip to our friend's store in town, Stylish Patina, to grab a can of Annie Sloan chalk paint. I chose Paris Gray because it was a good neutral, much lighter than the current stain, and when I held it up against the seat cushions it looked nice.
Paris Gray chalk paint by Annie Sloan
As usual with chalk paint, the transformation was a quick one: the first coat looked sloppy but the second touched up all of the smears and imperfections. Also as usual, I ran out of patience. It was a very windy day but I pushed through this tedious job, picking leaves off of the damp paint, and returning to the job after dark so I could finish in one day. Half finished jobs have a tendency to stay incomplete for some time in my house -- I've got to use the momentum of a new project while I still have it.
Painted chair frame, waiting for a seat
To seal chalk paint, there are two waxes: one light and one dark. I already had a tin of the dark wax leftover from my mudroom wall project a few years ago, so when the chairs were dry I blotted it on. Then I flipped each of chairs over and screwed on their seat cushions. The chairs were done.
They're ok but still not my style
I was hoping for that moment of satisfaction, knowing that I'd solved a problem. Unfortunately, it didn't come. The chairs look decent enough, but I'm not thrilled with them in my kitchen. The lighter color seems to clash with the warmer tones in the room. And the dark wax accentuates their shape -- maybe I should have sprung for a tin of the clear wax. Oh well. My father in law sits in them, and my mother in law does not seem offended that I repainted chairs that she picked out years ago. Good enough.

Tuesday, April 30, 2013

Side table rehab with upholstery (spring 2013)


Poor neglected table
My idea was to upholster this table to cover the ruined wood veneer, and to make it more kid-friendly for my 5 year old's bedroom. So one day when my daughter and I were running errands, we stopped into the Calico Corners up the street. They have a discount section in the back that is suitable for my haphazard projects. I asked my daughter to pick out something and she grabbed some purple & gold fabric that was on clearance for $7/yard. There was less than 2 yards left but I figured we could work with that, so I bought it.

We then headed to a local sewing hub, G Street Fabrics, where we got a wad of batting. I also picked up some brass tacks. (I always loved when my Mom, an accomplished upholsterer, finished a piece of furniture with a neat line of brass tacks and hoped I could work them in).

When I got home I cleaned off this poor table. It had been outside for 2 years and kicked around quite a bit before that, following my husband to various apartments and storage centers. Its veneer was shot but it was still solid and an interesting shape. And I can't stand to throw things out. This particular piece was by Lane, the cedar chest folks.

I unrolled some batting and flipped the table over top of it. This gave me an idea where to cut the first piece of batting. I stapled as I went.
Getting started with the batting
I started with the top, thinking that I might run out of fabric so why waste the effort on the other areas. Then partway through, I figured why not do it all at once? I hate repetitive tasks, and if I ran out of fabric I could always get another piece with a color and pattern that worked with it - or just rip off the batting and stain the rest. The top was my primary concern, as it was going to be the most-seen part of this table.

Top and bottom batting stapled on
The legs were an issue. I wasn't sure what to do about them. I covered them at first, and thought it might work. With fabric, however, they looked like unflattering 80s legwarmers (anyone who remembers that weird turn Woody Woodpecker took during their childhood can get the right visual). So I tore off the batting and fabric and left the legs bare. I need to oil them up and stain them.

Covering the legs turned out to be a bad idea... too puffy & unflattering


Using a staple gun, this whole process went quickly. I figured there was no great need for precision with batting. The fabric was another story: I had so little to work with, I had to maximize it. Of course, I'm not a very precise person so I still winged it! Just more slowly.

On the bottom surface, I reversed the fabric. It was really nice from both sides so I thought it might make an interesting contrast. And the lower area was certain to get less light, so more of the gold could help brighten it.

The vision in my head starts to become a reality... quickly, thankfully

Finally I was ready to finish off the edges. I tucked and pulled and then quickly hammered some brass tacks around the edges. It's amazing how often a small touch becomes the part of something that I love the most. My husband hauled this inside and up to my daughter's room before it started raining... just in the nick of time. That night, she must have decided that this could be a "bunk bed" because we found her tucked into the bottom area, with her pillow and blanket, in the morning.

More or less a finished piece!
Time to complete: 3 hours
Supplies: approx. $40 - specifically:
              $14 for fabric
              $5 for brass tacks
              $20 for batting
              $0 pre-existing table, existing staple gun and staples