Monday, January 11, 2016

Coral-inspired chandelier rehab with the kids (Dec 2015 - Jan 2016)

Castoff chandelier transformed with plaster into coral
Our kitchen and dining areas have never had a great amount of light. Over the years the dated track lights had mostly burned out and were difficult to replace. In desperation I hung a paper lantern from IKEA over our table a few years ago, and it helped, but I've wanted a more permanent solution. I've trolled Houzz and various magazines for ideas but lighting is ridiculously expensive. Some DIYer paint old fixtures eccentric colors, but that never grabbed me. Covering an old fixture in plaster, on the other hand, was interesting. I liked the chalky, neutral look of a dipped or sculpted lamp.
Old ceiling lamp, minus a heavy ball of brass that used to be attached underneath
So one day at Habitat ReStore I perused the selection of donated lamps that were donated. If I could find something with the right size and basic shape, for minimal investment, I figure I'd take a chance and make it over with plaster. But I was confused: all of the lamps had a snipped wire on top. What could I do with that? The folks there explained to me that the wires can be connected to an existing electrical box; we've been needing an electrician's help on some other projects so I figured, what's one more? At the urging of another customer, I haggled over the price of a big, brassy monster (yes, I haggled with a charity) and hauled home 40 or so lbs of dusty metal for $17.
Electrical parts are protected and the bucket keeps everything steady
After buying a device to test the sockets to make sure they'd work, I put down a drop cloth and propped the lamp in a plastic bucket so I could reach around its arms. My daughter and I had purchased gauze dipped in plaster of paris from Michael's, and snipped it into small pieces. Then we got a small bucket of water and started dipping the pieces in and wrapping them around the lamp.
My daughter fearlessly starts layering on the plaster-coated strips
I was so glad to have a project I could work on with my kids and not worry about something getting damaged. The lamp was not precious, and drips of plaster are easily wiped up or chipped off. I flashed back to my childhood art teacher, who took on ambitious projects with elementary school kids (Mrs. Quakenbush, wherever you are, thank you). And of course my Mom was awesome, constantly giving us the clay, fabric, etc. to be creative. I want my kids to have that type of experience.
Much of the lamp is now chalky and white
As the brassiness changed over to matte white, the lamp resembled a barnacle-coated artifact from a shipwreck. I liked the look and wasn't sure if we needed to keep going with the coral idea. But at a minimum, something had to be done about the fake "candlesticks" -- they had been covered in plastic tubes that I had immediately (prematurely) discarded. Underneath were some wires that I didn't think should be coated with plaster. But how could I make that area look cohesive? I went back to Michaels and found some wire mesh, and without knowing quite what to do, I bent rough forms around each stem so we had a surface for some plaster. I'm not wile about the result but don't have a better idea.
Mesh keeps plaster away from wires (painters tape keeps sockets clear of debris)
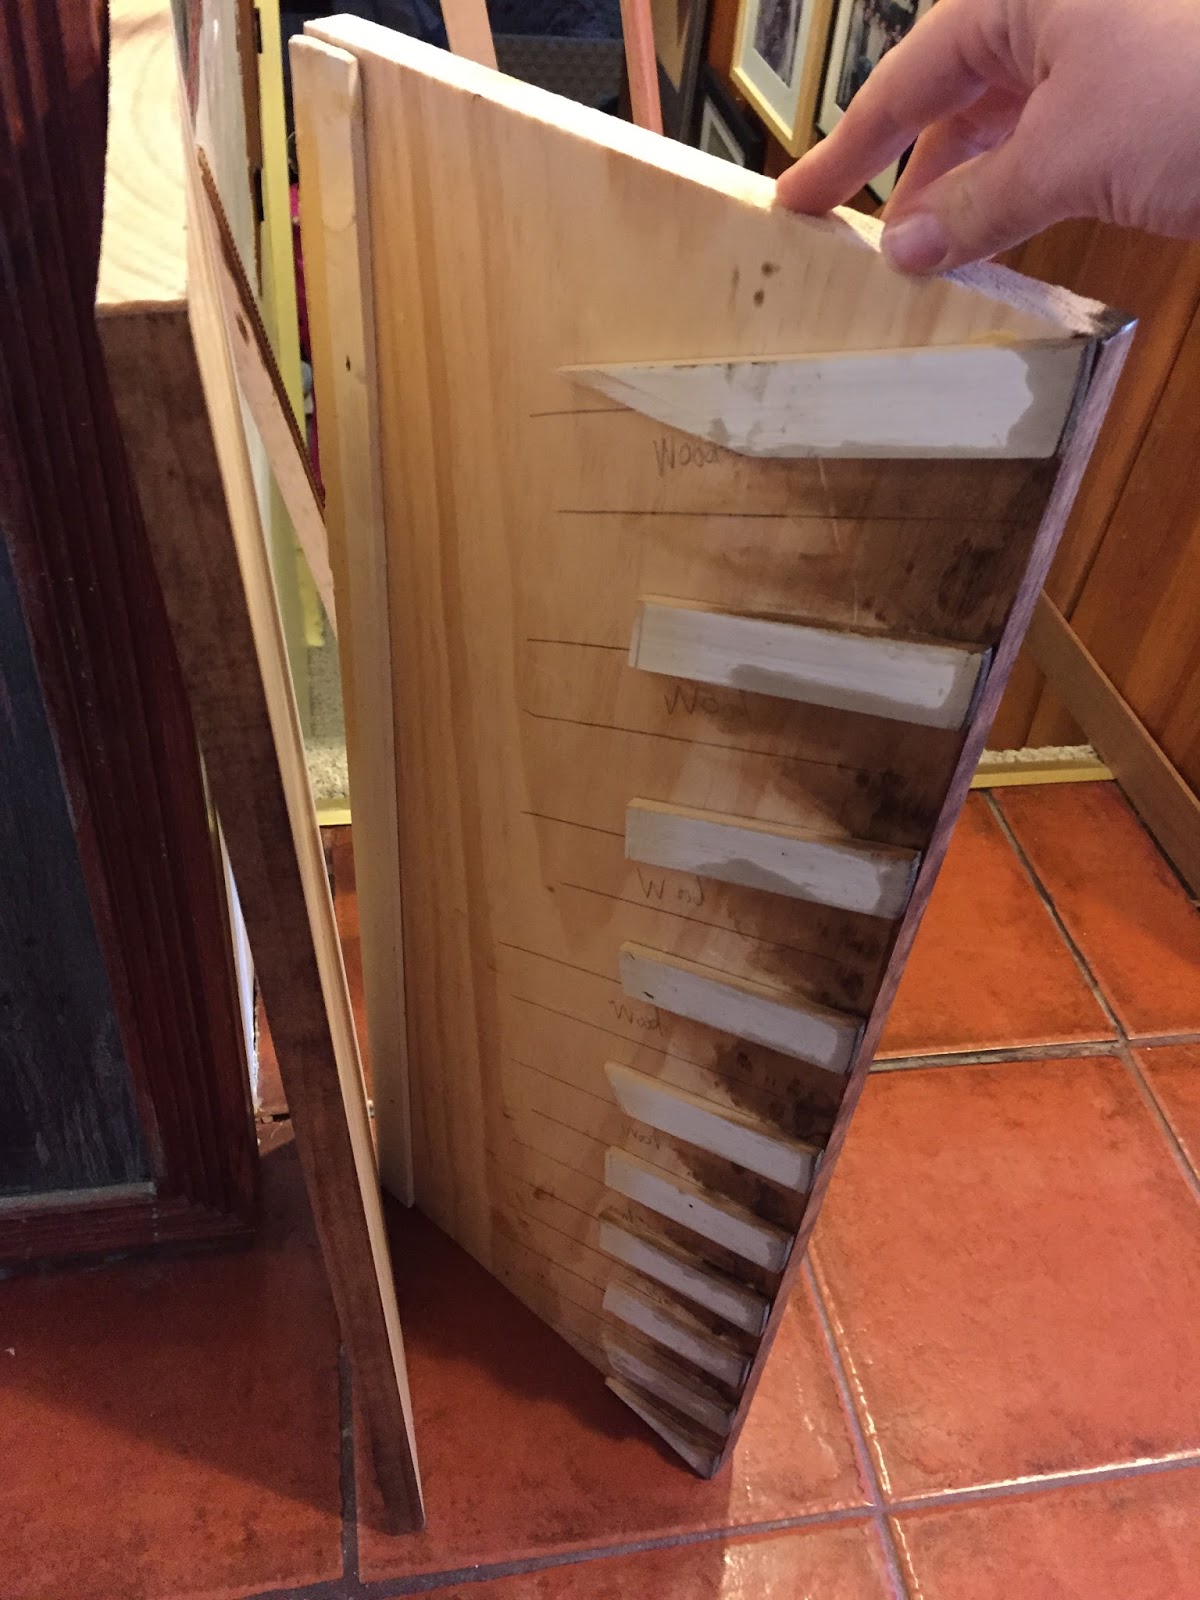
Layers of plaster cover the mesh to create a ... tulip shape?
Now what? I decided we might as well try to go with coral shapes to distract from the bulky socket covers. I started piling up small blobs to simulate knobs and protrusions of some types of coral. It took a long time to build up each little bump, and I was getting tired, when my 6 year old son plopped down next to me and asked to help. He started smooshing big, messy gobs onto the side of the lamp. They looked awkward compared to the smooth pieces my daughter and I had labored over. But they stuck way out, and I had a breakthrough: this is how we can efficiently create extra "branches" of coral! We could quickly apply lots of shapes, then later apply a polished layer over them.
New shapes emerge from the formerly smooth surface
We kept at this on and off for a few more days. Towards the end I asked the kids to use the plaster dust to create a paste and smear it over any areas that still looked like fabric (the weave was very visible in some areas). Ultimately I broke out an old tub of gesso and handed my 8 year old a paintbrush. She went to town, filling in seams and imperfections.
This has taken up a pretty big chunk of our kitchen for two weeks
Finally it was time for the electricians to come and hang the lamp. I was nervous that it might not be functional. What if it was too heavy? What if there was an issue with the wiring after all? What if they just laughed and said, "no way!" ...? I kept my fingers crossed that it would work out.
Propped on the counter in anticipation of replacing the IKEA pendant in the background
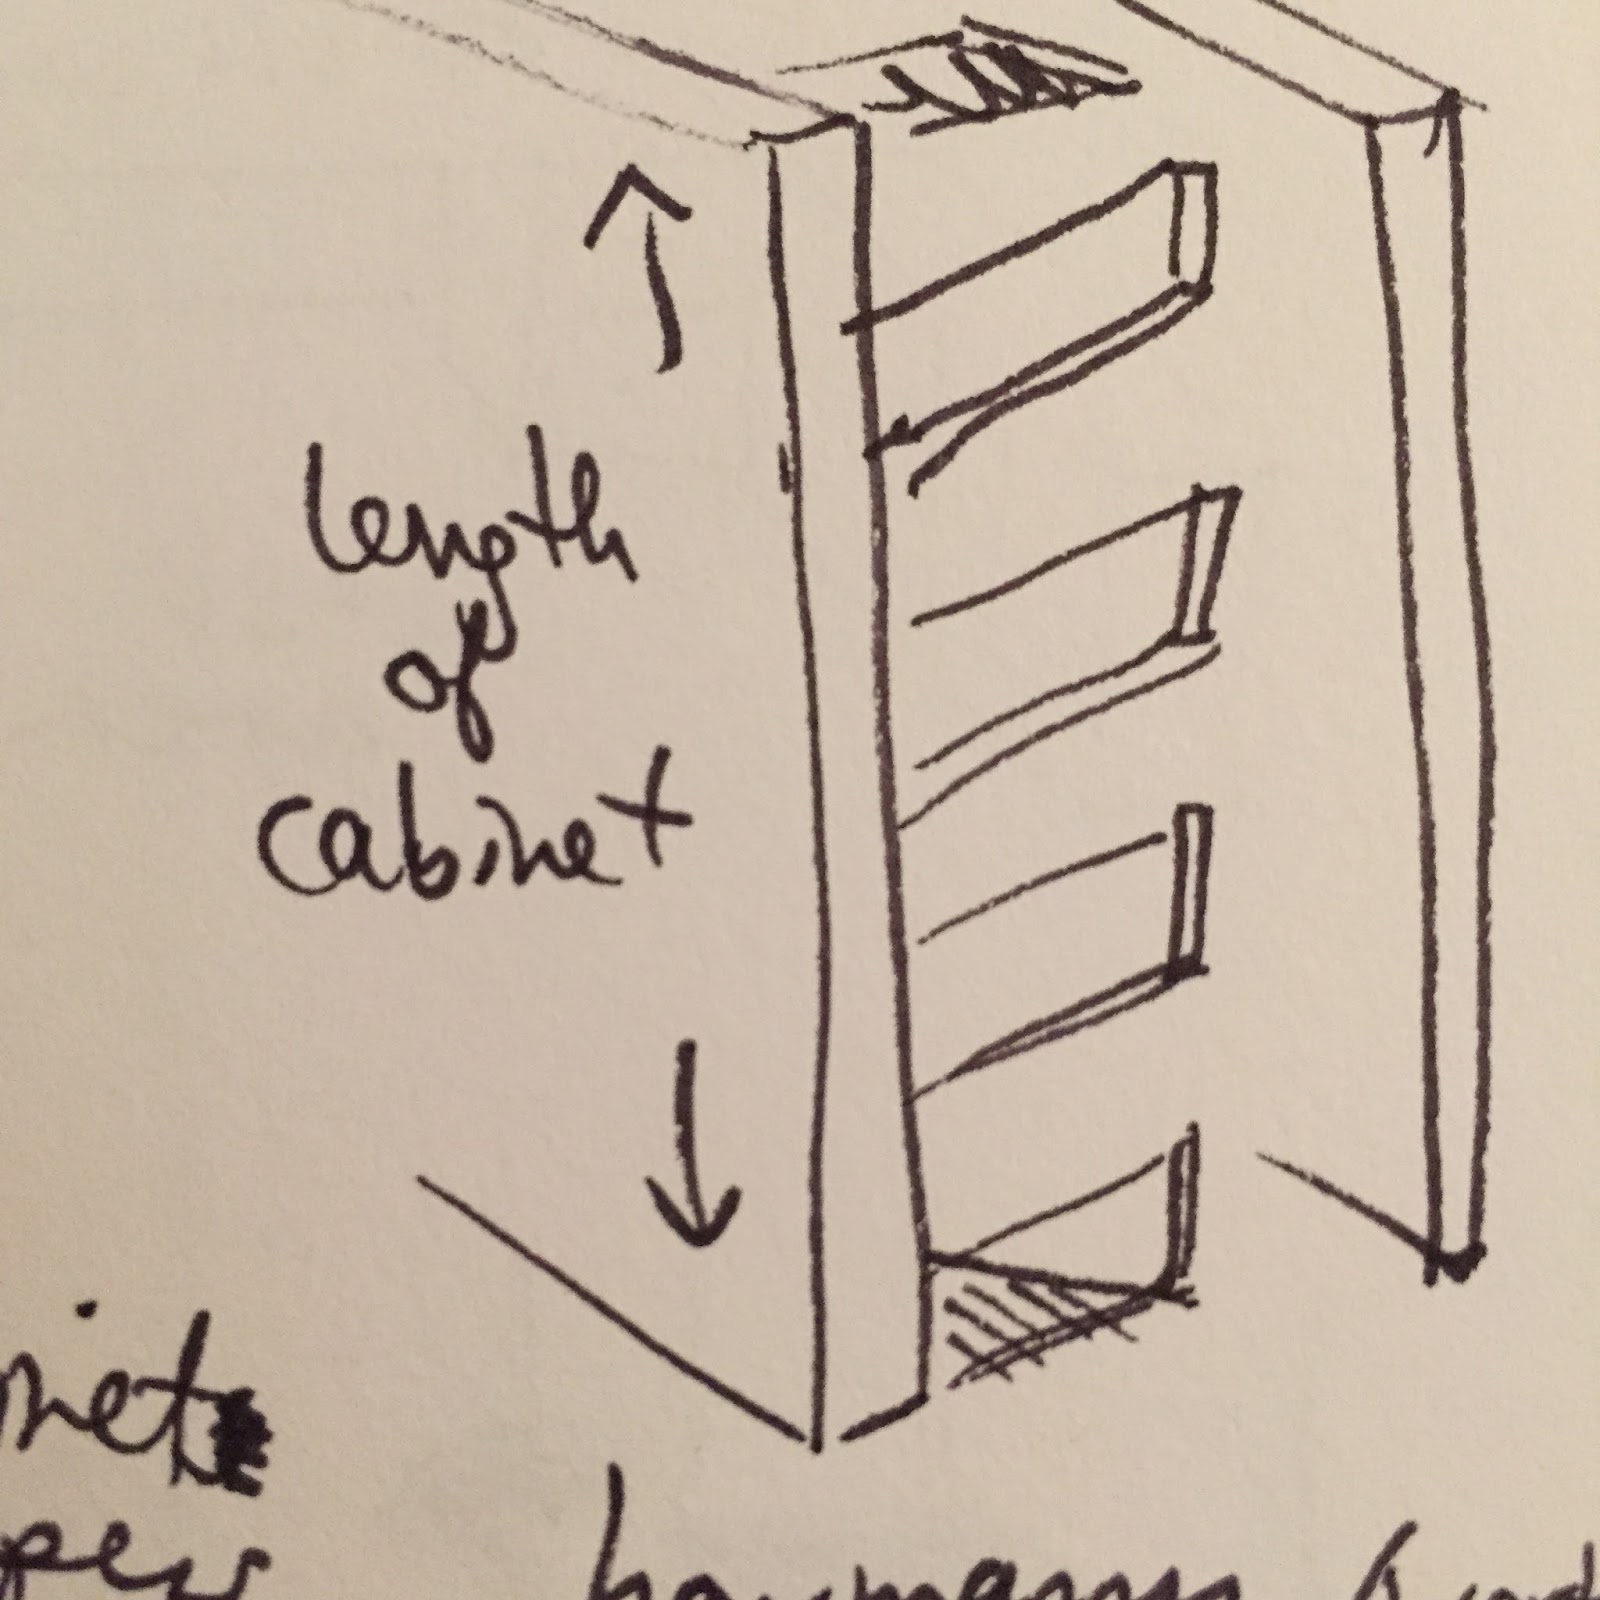
Turns out there were a few parts missing that were crucial for hanging a chandelier, but thankfully the best hardware store ever (Ayers in Westover) is not far. And of course they had the odd bits that were needed. Because they're mystical.
Electricians sketched the pieces that I needed to find
The chandelier went up. The power turned on. It worked! I picked the kids up from school and they were SO PROUD of their achievement. It's not for everyone, but it is for us! I love it. And if we want to make it bigger, bolder, smoother, a different color? We can do it. With a step ladder.
Finished product in place

Built-in knife rack (November 2015)

Knife rack built into unused gap between cabinets and wall
We needed a good solution for storing knives. Drawer knife holders are not far enough out of reach for young kids. A counter top knife block would hog precious space. Wall magnets keep blades out of the way -- but in our small kitchen, "out of the way" could easily be bumped. For lack of a better option, we installed magnetic strips along our wall, but for years I envisioned a cascade of knives whenever a door was slammed.
Wall magnets where our knives used to hang, in front of unused gap
Between one of our sets of upper cabinets and the wall there was a gap. It looked awkward and I've long wondered what I could do with that space. Add a ledge at the bottom so we can store cutting boards or baking sheets? Buy a slide-out spice rack? I checked online but there were no easy solutions that would improve our lives. I kept going back to the awkward knife situation. There are a few images of pull-out knife blocks but the blades slide in from above. We are tall but not THAT tall. So I started sketching something I might be able to assemble myself.
Early sketch of idea for knife block that used wasted space
I didn't know what supplies I should use, how they would fit, or how to best secure this in place. I sketched some more, looked online some more, then thought about sandwiching a thin magnetic sheet between the layers of wood, to hold the knives put. I found what I needed on Amazon and placed an order. Momentum started to build.
Ideas continue to percolate
I looked around in the garage and found some scraps of wood, saving me a trip. Among the odds and ends was a long thin strip of lathe, and two boards that were pretty close to the height of my cabinet. I held them up and had an idea -- what if the rack went to the ceiling? The extra room would come in handy, and it might look more finished. I could trim off the top so it resembled the other cabinets I extended to the ceiling last year.
Simple box to hold odds and ends at the bottom of the rack
The wood wasn't long enough to extend from the ceiling to the bottom of the cabinet. What if I added a magnetized catch-all cubby at the bottom, for sharp stuff like the pizza cutter and cooking shears? I measured and cut some additional pieces that create a box below the knife holder.
Existing knives served as a template for the openings
Next I laid each of our existing knives on one of the boards and roughly traced where they might go, using the strip of lathe as a placeholder between them. The shorter blades made sense at the bottom, where there wasn't a lot of room, and the longer knifes had enough room higher up.
Ready to fit together 
I used wood glue to affix strips of lathe to the inside of the wood sandwich. These strips weren't pretty; I cut them roughly into the lengths I needed, only worrying about the angle of the edge that faced outwards. Next I stained the portions of this assembly that would be visible. I also sanded the sides of the wood that would touch the knives, so nothing funky would make its way into our food.
Whatever it takes to keep the pieces pressed firmly together while the glue dries
The strip of magnet that I purchased had adhesive on one side, and I assumed it would be strong enough to grab the knives as they slid into the holder. Turns out it's not particularly robust, and to make matters worse, the adhesive on the back is weak. That's fine for the knife slots because they are so narrow, it's not going anywhere, and the slots are slanted so the knives aren't going anywhere either. But in the wider opening of the cubby underneath, it's a bust. That area will probably need more powerful magnets in the future.
Not as sticky as it needed to be
When it was time to hang up my creation, I started by sliding the cubby into the gap. It was a tight fit, and I needed to tap it into place with a hammer. This was a blessing because I now had a resting place for the bigger knife holder.
Cubby finished with some quarter-round trim (idea was that this would be magnetized)
There was room on either side of the knife rack so I tapped some shims (thin slivers of wood) in with a hammer until it was snug. Next I hid the shims and gaps with a strip of trim leftover from another project.
Assembly and staining in progress
The top of the knife rack didn't quite reach the ceiling, so I wedged a block of wood up there and gathered up some leftover molding. My miter saw and box came in handy yet again as I cut the scraps to size. Rather than hammer them on, I took a shortcut and glued the pieces then used painter's tape to keep them in place while they dried. This was not an area that was going to be bumped often so I didn't want to invest a lot of time or risk shifting the shims etc. with an errant blow of the hammer. I slopped on some stain and called it a night.
Messy stain but it does the trick, and the ceiling etc. are due to be repainted
I started to affix more tiles onto the wall in front of the knife rack, which I'd been slowly covering over the past year as dishes broke or I got another box of tile. I knew I couldn't complete the mosaic wall right away but wanted to get a sense for how the wall might look when it was finally complete.
Knife rack with cubby underneath, and tiles in the process of being adhered to the wall
We've been using the knife rack for two months and it's doing the trick. I'm relieved we don't have a hazardous wall of knives, and it feels good to do something with an otherwise wasted space. I can't wait until our kitchen is painted and the tile wall is complete.

Friday, November 27, 2015

Rehab overgrown area by curb and build stacked stone wall

New rock wall and tree neaten up our entrance
Two old, large maples have graced the sides of our front walkway until recently. Unfortunately, over the past few years we noticed that one of them was being eaten by insects. Apparently the department of transportation is responsible for the trees along our street, so I contacted them to check out its health. One day I noticed that the tree had been marked with spray paint -- apparently VDOT came and decided that the tree could not be saved.
Poor tree was marked for its demise
Several months passed and one day there was a crew in my yard, ready to go. They were worried about nearby wires, and I gave them the green light to do whatever they could to avoid them, even if that meant our old fence might get hit.
Tree being taken down carefully, to avoid wires
I knew it would not be a pretty sight when the tree was gone, but what greeted us was downright ugly. The falling limbs did take out part of the fence, which was already dilapidated -- but it never concerned me because it had always been hidden. Several Rose of Sharon trees along the fence had been heavily pruned. The old tree's wide stump remained. An overgrown old planter was full of weeds and was falling apart.
Yuck
This area of our home was not on my radar as needy. Now every time I came home I saw an eyesore. I had to do something. But what? I was not going to hire pros, so what could I do to make this look better?
So welcoming...
The first thing I wanted was a new tree to bring life back to this area, and maybe a little privacy. Our backyard had never been so visible in our years in this home. The weekend after the old tree was chopped, my brother in law left his convertible at our house in exchange for my car. I had a brainstorm: without a top, this could be useful to transport a tree! I packed my kids in and we headed to our local garden center.
The staff was skeptical and kept asking how far I was going to drive the tree
We picked out a nice, tall arborvitae and carefully drove it home. I dug a hole while the kids sort of helped, and we plunked it in. Already the spot looked a little better.
Tree helps a bit
The rubble in this area was difficult to remove. The weeds I could pull out, and I clipped back some Rose of Sharon sprouts. But there were lots of bricks and rocks and some cinder block shards too... lovely. The long wooden posts bordering this garden bed were nailed together and proved impossible for me to remove: I tugged, jumped and pried to no avail. They would have to wait until my husband could help.
Had to call in the big guns
It ultimately took two of us plus a saw, an ax, a sledge, and a shovel to dislodge those messy wood borders. A lot of daylight was burned and I worried that it could be weeks or months before I had another surge of energy and the time to act on it. I pressed on, with the help of my daughter, who loaded up some of the stones I'd bought a month or so ago for the park benches on our corner.
Busting her hump to earn her keep
I liked the idea of a stone area by the benches, but the rocks I'd laid were not flat enough. They wobbled when we walked on them, and I was afraid this area would not be good for someone without firm footing. Rather than wait for the stones to eventually sink in, I would re-purpose them as a retaining wall.
Starting to lay the stones
I scooped away some dirt so the garden bed was an arc. Thankfully the soil did not cascade down and make a mess (I anticipated holding back a landslide and had a plank of wood and a stake ready). Laying the stones went much faster than I thought it would. Each rock was like a puzzle piece, and I only had to flip or spin it to see how it might fit. The shapes naturally worked together.
So much better!
I'm sore and our wheelbarrow broke while I was loading up stones, but it's done! It's not perfect, but what was an eyesore for months now looks a million times better. I'm elated! Progress! Now to surprise my kids with some Christmas ornaments for that tree.

Wednesday, November 25, 2015

Corner bench project with the kids to boost curb appeal on our corner

Final product gives the neighborhood a resting place
Our home is on a corner, and the previous owners planted a hedgerow between the street and the house. In our six years here, I have struggled to keep the edge of the property looking decent. Weeds grow fast and thick, and at least four types of invasive vines choke out our shrubs and trees. In my attempts to hack away at the mess, I've had bad poison ivy, been poked in the eye by a stray branch, been stung by a wasp... but worst of all, after each attempt everything springs back. It's embarrassing to have the sloppiest area of the street, but I am not intersted in constantly toiling away out there.
Overgrown, messy corner not long after I tried pruning & weed whacking
My husband made a suggestion one day, perhaps not a serious one, but it stuck in my head. He asked if we should put a bench out there. I wasn't looking to spend money on a bench outside our house and yard, when we have so many projects I'd rather invest my money and time in. But I liked the idea of a perch for the 'hood, for the parents with small kids on bikes and the dog walkers. I would love our neighborhood to be more friendly. And... what if more pedestrians meant slower traffic? I toyed with the idea of creating a cement bench, a la Gaudi or something you'd see in Seville. I'd cover it in mosaics and add a drain hole so puddles wouldn't collect on the seat.

Time passed, and one day on the way to work I was at Habitat ReStore with a donation. In the drop-off area I noticed two metal benches. Out of curiousity, I asked how much they cost. The guy working there told me he's planning to paint them and sell the pair for $75. I asked how much if they weren't painted, and he knocked a bit off the price. Still too much for my nonexistant budget.

I happened to be back at the store later the same week. Another customer encouraged me to haggle over a lamp, and I told him I was embarrassed to do so -- Habitat could use all the money they get! But he laughed at me and started haggling for me. I walked out of there with benches and a lamp for about $40. That day I brought the kids to my favorite hardware store (Ayers Hardware in Arlington, VA) and they picked out some spray paint.
Kids going to town with their cans of spray paint
We got home and got to work. They had never used spray paint and it's hard to instruct 2 kids at once, so a fair amount ended up on their clothes and skin. And mine. But they did a great job and were so proud of the results. We ended up using a roller and an old can of paint to finish the job, as the spray paint ran out partway through. (This is my third attempt to use the stuff and I think I'm officially not a spray paint fan).
Benches are situated in cleared area
I had weed-whacked the area and replanted two azeleas so there was a clearing for the benches. The kids helped decide where they should be located.
Some seasonal flair, to please my kids
Later we added some decorations (my kids always beg me to make our place more festive). My favorite are the solar lights. Because they went up long before Christmas, I'm not going to take them down after Christmas.
White solar lights last until at least bedtime if the day was sunny
To keep the weeds at bay, I stopped by a local stone shop (Sisler's Stone in Falls Church, VA) and grabbed a bunch of flat stones. I thought I had enough to make a little wall or two, too. It didn't stretch as far as I thought! Also, the stones are thicker than stepping stones should be, so they wobble. At some point I'll replace them with larger, flatter slabs.

This was an unexpected project but it makes me happy every time I round the corner. It's great to see how proud the kids are, too.

Quick refresh for dated brass hardware

Left is before, right is after
I keep hearing people suggest swapping out knobs and drawer pulls as a quick way to refresh a room. That seems like a great idea -- relatively cheap, easy for anyone with a screwdriver -- and there are so many possibilities. Glass knobs, organic twig-shaped drawer pulls, etc. My problem was choosing which style I liked the best. I decided to wait until something really grabbed me.

There have been articles in home improvement magazines about burnished brass. It has been making a comeback -- but I wasn't sure if this warm-toned metal would be a flash in the pan, so I didn't give it serious thought.
All of the knobs looked dated and worn
Then one day I grabbed one of the dated knobs in my kitchen and noticed how scratched and pitted it was. Some of the shiny coating had worn off. I thought again of replacing all of them. But an idea sprouted: could this be brass? I unscrewed it. It was heavy and there was some tarnish on the back. Those were promising signs.

Could I get rid of the shiny coating? I grabbed some fine grit sandpaper and gave the knob a swipe. The scratched, pitted shiny surface rubbed off immemdiately. A few more swipes and the surface was dulled. It looked so much better, and it felt so velvety.
Much  better!
I quickly unscrewed all of the knobs around the kitchen. It didn't take long to brush each of them with the sandpaper and reveal the soft surface of the brass. (If I had done this while the knobs were still attached to the cabinets, I would have had a hard time avoiding the wood). The metal glowed in the light.

It's been several months and the knobs still look good. I think they will continue to wear well, because there is no coating to be dinged. As long as we continue to open the cabinets regularly, the oil from our fingers should keep them from tarnishing.

The best part is, this change was small, fast and free. The knobs feel nice to the touch, velvety and solid. This was a satisfying change.

Making due with hand-me-down dining chairs

Sturdy chairs from our garage replace our crumbling set
The dining room chairs that I reapholstered a few years ago (documented here) have been slowly disintegrating. The legs were loose despite several attempts to glue the joints, and after adding metal brackets for support. Recently, pieces started to snap off; the wood was too dry and brittle. Still, I was not comfortable getting rid of these chairs because they belonged to my father in law's aunts. I also liked their shape -- they made me think of a hacienda.

Then my father in law refused to sit in them. They squeeked and wobbled so much that he was afraid they would collapse and someone would get hurt. I started browsing online for alternatives. None were a great fit, and even a set of inexpensive new chairs would cost a thousand dollars. I would rather spend that on contractors to deal with improvements that I can't hack myself. So it made sense to turn to our garage, where a set of hand-me-down chairs had been lurking for the past year.

The first thing that needed to change was their seat covers. My mother in law had tried to freshen them, but the fabric she chose would not last a week with my kids.
These cushions needed an overhaul with durable fabric
I rooted through my fabric scraps from other projects and found a few pieces that could work. These were quickly cut to size and stapled over the seats. (For more instructions on how to redo this type of seat cushion, see my earlier post).
Scraps big enough to cover the seat cushions
New fabric wrapped around the seat and stapled underneath
Now all that was left was to screw the seats back onto the chairs.
Mismatched seat covers felt cohesive enough
But I did not love the finish on these chairs. A little of that tone would be ok, but it was too similar to our cabinets and floor. Also, I didn't care for the shape of these chairs. They are too curvy, too fancy. Hmm... I could not DIY my way out of the shape, but what if I lightened up the wood?
Color of the wood was too similar to our dark cabinets and floor
I made a quick trip to our friend's store in town, Stylish Patina, to grab a can of Annie Sloan chalk paint. I chose Paris Gray because it was a good neutral, much lighter than the current stain, and when I held it up against the seat cushions it looked nice.
Paris Gray chalk paint by Annie Sloan
As usual with chalk paint, the transformation was a quick one: the first coat looked sloppy but the second touched up all of the smears and imperfections. Also as usual, I ran out of patience. It was a very windy day but I pushed through this tedious job, picking leaves off of the damp paint, and returning to the job after dark so I could finish in one day. Half finished jobs have a tendency to stay incomplete for some time in my house -- I've got to use the momentum of a new project while I still have it.
Painted chair frame, waiting for a seat
To seal chalk paint, there are two waxes: one light and one dark. I already had a tin of the dark wax leftover from my mudroom wall project a few years ago, so when the chairs were dry I blotted it on. Then I flipped each of chairs over and screwed on their seat cushions. The chairs were done.
They're ok but still not my style
I was hoping for that moment of satisfaction, knowing that I'd solved a problem. Unfortunately, it didn't come. The chairs look decent enough, but I'm not thrilled with them in my kitchen. The lighter color seems to clash with the warmer tones in the room. And the dark wax accentuates their shape -- maybe I should have sprung for a tin of the clear wax. Oh well. My father in law sits in them, and my mother in law does not seem offended that I repainted chairs that she picked out years ago. Good enough.